Good afternoon lovelies!
The weather here is just an absolute disaster, which makes it perfect for crafting time! Last summer I already got the idea, but didn’t have the time to work it out. While I made it, I thought, why not share it with you? Here’s the tutorial to make your very own 3 tier cake stand.
The weather here is just an absolute disaster, which makes it perfect for crafting time! Last summer I already got the idea, but didn’t have the time to work it out. While I made it, I thought, why not share it with you? Here’s the tutorial to make your very own 3 tier cake stand.
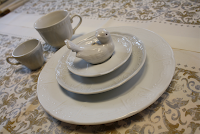
What do you need?
- 3 different sized plates, preferable a dinner plate, cake plate and a saucer plate
- 2 mugs, preferable a bigger and smaller one
- Little ceramic ornament, this can be everything, from bird to deer and everything in between
- Superglue for glass (this really did the trick for me!)
To save money and make it extra unique, go
to your local secondhandshop and browse for the plates, mugs and a little ornament.
I got all this for under €2! The glue was more expensive, haha.
I chose all white, but you can also pick other colors and mix and match. If you find my version too boring, why not paint it with ceramic paint?
Step 1:
Clean all the plates, mugs and ornament to be dust free. This makes the gluing process easier.
Glue the biggest mug upside down to the bottom plate, follow the instructions on your glue for the best job!
Clean all the plates, mugs and ornament to be dust free. This makes the gluing process easier.
Glue the biggest mug upside down to the bottom plate, follow the instructions on your glue for the best job!
Step 2:
Glue the middle sized plate on top of the upside down biggest mug, and glue the little mug upside down on the middle sized plate. Give the glue a little bit time in between to harden.
Glue the middle sized plate on top of the upside down biggest mug, and glue the little mug upside down on the middle sized plate. Give the glue a little bit time in between to harden.
Step 3:
Glue the little saucer plate on top, and finish off with gluing your little ornament on top!
Again, let the glue dry properly.
Glue the little saucer plate on top, and finish off with gluing your little ornament on top!
Again, let the glue dry properly.
Step 4:
Time to decorate!
The cake stand can be used for anything,
why not put all your little hair bows and flower combs on it for display? Or place it in your bathroom
for all your bath balls? And you can always use it for an upcoming tea party ;)
Be creative!
Be creative!
Thanks for reading, and please show your finished cake stands! :D
x Katie


